Home
HomeWinamp help
Help contents
- 1 Getting Started
- 2 The Winamp Media Player
- 3 The Winamp Media Library
- 4 Ripping and Burning with Winamp
- 5 Winamp for Android
- 6 Winamp for Mac Sync Beta
- 7 Trouble Shooting
- 8 Winamp Toolbar
Getting Started
Welcome to Winamp. It is more than just a player. It's your window to the multimedia world. From MP3s to streaming video, Winamp is the one place you go to feed your audio/video habit.
Here are just some of the hot, new things you can do with the latest version of Winamp:
- Winamp can use both Modern and Classic skins, so you can be both hip and retro at the same time.
- Winamp gives you easy and organized access to your favorite media. That's what you call mass media.
- Winamp can play a huge variety of audio and video formats right out of the box... err... out of the installation.
- You get access to hundreds of free audio and video channels in the Media Library. This ain't your father's library.
- Winamp can burn your music to Audio CDs. Burn baby burn!
- Winamp makes it easy to create and manage your favorite songs through playlists. Yes, you can be your own DJ.
- Winamp allows you to extend its functionality through the use of "plug-ins". It's like the Mr. Potato Head® of music.
- Winamp can manage all of your portable media players and devices. Plug in, turn on, tune in, drop out...
- Winamp allows you to alter the sound of your music through a built-in Equalizer. An audio receiver right on your computer.
- Winamp allows you to watch visual effects that are driven from your music with Visualizations. From flaming fireballs to screaming strobe effects, it's all there.
Some sweet treats you get only with Winamp Pro:
- Rip and burn your audio CDs at speeds of up-to 48x
- Rip your audio CDs to high-quality MP3
- Convert other formats to MP3
- Play MPEG-4 video formats straight out-of-the-box
Here's a video that might help you
Set Up
System Requirements
These are the system requirements for Winamp:
Minimum
- 500MHz Pentium III or comparable
- 256MB RAM
- 20MB Hard Disk Space
- 16bit Sound Card
- Windows XP or later
- DirectX 9.0c (for viewing videos and Milkdrop vis)
- Internet Explorer 5.01 or higher (for Online Services)
- 1x speed or greater CD Burner (Required for Burning)
- 2x speed or greater CDROM (Required for Ripping)
Recommended
- 1.5 GHz Pentium IV or better
- 500MB RAM or more
- 50MB Hard Disk Space
- 24bit Sound Card
- 500MB AGP or PCIE Graphics Card (for watching videos)
- Windows XP sp3, or later
- Internet Explorer 6.0 or higher (for all Online Services features)
- 8x speed or greater CD Burner (Required for Burning)
- 16x speed or greater CDROM (Required for Ripping)
Go to http://www.winamp.com/player to download the latest Winamp Media Player.
Installing Winamp
For step by step instructions click here for Winamp Installation Notes
Making Winamp the Default Player
Winamp can play and organize dozens of popular media files, whether it's audio CDs, videos, MP3s, or other files. You can configure Winamp to handle the playback of some or all of Winamp's supported media.
Click to find out how to make Winamp Media Player as a default player.
Displaying Unicode Titles
Please go through the documentation Displaying International (Unicode) Titles With Winamp 5.5x.
Uninstalling Winamp
To uninstall Winamp
- Click Start on the Windows taskbar.
- Either click Control Panel or open Settings and click Control Panel. The Control Panel opens.
- Double-click Add or Remove Programs or Add/Remove Programs. The Add or Remove Programs window opens.
- Select Winamp in the list of programs.
- Click Add/Remove or Change/Remove. The Winamp Uninstall window opens.
- Follow the on-screen instructions to uninstall Winamp.
Note: Items such as Winamp Remote, Winamp Toolbar and Emusic Offer have separate uninstall entries.
The Winamp Media Player
Using the Winamp Media Player
As in previous versions, The Winamp Player is a flexible and sophisticated application for playing and managing your music. With the latest release, the player is easier than ever to use with a new, powerful and intuitive interface.
Click on the link below and you can see the Bento skin. Point to a part of the image using your mouse cursor to learn more about each part of the Bento Skin interface.
Playing MP3 Files
MP3 is the most popular for music on the Internet because its small size and high quality. To play an MP3 file, do one of the following:
- Drag a file from a folder on your computer to the Winamp main window.
- Click the Open File(s) button
 and select a file on your computer.
 - Open the File menu and click Open File.
Playing Audio CDs
To play a CD
- With Winamp open, insert a CD into your computer's CD-ROM drive. If you have made Winamp the default player for audio CDs in the Winamp preferences, the CD should play automatically.
- In case the CD doesn't automatically play, open the File menu and click Play Folder. The Open Folder window appears.
- Select the CD-ROM drive that contains your audio CD and click OK.
Other methods of playing Audio CDs
- Or use: Main Menu --> Play --> Audio CD X:. The main menu is accessible via the top left-corner icon, or by right-clicking the frame. Note: This method is required for playing Enhanced CDs.
- Or type the following into the "Add/Open URL" dialog: cda://X(where "X" is the CD Drive letter)
- Or open the Media Library, go to your CD Drive listed under Rip & Burn, and click one of the 'Play' or 'Enqueue' buttons.
Note:
- If you are connected to the Internet, Winamp will connect to the CDDB database (Gracenote’s CDDB® database is an online music database that can recognize and display CD track information) to find matching CD information.
Skinning Winamp
Winamp5 uses the same, ever-lovin' skinning engine available in the Winamp2 versions of the player. But fear not. You can also use freeform skins (also known as Modern Skins) designed for Winamp3.
To change skins
- From the Options menu, open Apply Skin and choose a skin from the list of available skins.
To get more skins
By default Winamp uses the Modern skin, but you can choose among countless skins available online:
- Classic and Modern skins: Winamp Skins Gallery
To make skins
With a dash of design skills and a sprinkle of programming skills, you can make Winamp look the way you want it to be. Here's how: Winamp Developer Network - Skins
Tip:
- If you are a master of the right-click, you can right-click on the Winamp main window and get to the Skins menu.
Winamp Playlists
The Winamp® playlist organizes your music files, your videos, favorite internet radio stations and all of your media resources into a single, intuitive interface. If you are using Winamp for the first time, then the playlist may be empty.
Loading Playlists
A playlist lets you keep a list of tracks to play whenever you want. You get to keep your choice and order of tracks.
To open the Playlist Editor
- Open the Main or View menu and select Playlist Editor.
To load a playlist Open the File menu and click Open Playlist.
To load a playlist from the Media Library
- Click the Manage Playlist button and select Open Playlist from Media Library.
- Or for Classic skins you can right-click the List Opts button to access the same menu.
- Or right-click on the frame or any blank space in the Main or Playlist windows (or use the Main menu from the top left corner icon) and select Play > Playlist from Media Library.
- Or open the Media Library window, and load a playlist via the Playlists view.
Playlist Editing
The Winamp playlist organizes your music files, your videos, favorite internet radio stations and all of your media resources into a single, intuitive interface. If you are using Winamp for the first time, then the playlist may be empty. You can edit your playlist in any of these ways:
Add Button: Click this button for track addition options.
- Add files(s): Add files from your computer to the current playlist.
- Add directory: Add a directory on your computer to the current playlist.
- Add location: Add an Internet location to the current playlist.
Rem (Remove) Button: Click this button for removal options.
- Remove selected files: Remove the selected tracks from the current playlist.
- Crop selected: Only keep the selected tracks, while removing others.
- Clear playlist: Remove all the tracks in the current playlist.
- Remove
- Remove all dead files : Remove tracks that have missing, moved, or deleted files.
- Physically remove selected file(s): Delete selected tracks from your computer. Caution: Using this option will permanently remove the selected tracks from your computer and they will be irrecoverable.
- Remove duplicate entries : Remove any multiple entries of the same file.
Sel (Select) Button: Click this button for selection options.
- Select all: Select all of the tracks in the current playlist.
- Select none: Select none of the tracks in the current playlist.
- Invert selection: Select all of the unselected tracks in the current playlist, and clear the selected tracks.
Misc (Miscellaneous) Button: Click this button for miscellaneous options.
- File Info
- File info: Display detailed information about the selected track.
- Playlist entry: Change the file location associated with the select track.
- Sort
- Sort list by title: Sort the playlist by title.
- Sort list by filename: Sort the playlist by the filename of each track.
- Sort list by path and filename: Sort the playlist first by path and then by filename.
- Reverse list: Reverse the current order of the playlist.
- Randomize list: Shuffles up the current order of the playlist.
- Misc
- Generate HTML playlist: Create an HTML version of the current playlist.
- Read extended info on selection: Read any additional information from the ID3 tag for the selected track.
Manage Playlist (Miscellaneous) Button: Click this button for list-related options.
- Open playlist: Open a saved playlist.
- Open Media Library view results: Open a Local Media view from the Media Library.
- Open playlist from Library: Open a playlist saved in the Media Library.
- Save playlist: Save the current playlist.
- New playlist (clear): Clear the current playlist.
- Manage Playlist: Open the Playlists panel of the Media Library.
You may also check out this cool video tutorial
Saving Playlists
Once you've got the tracks you want in your playlist, make sure you save it for future generations.
To save a playlist
- Open the File menu and click Save Playlist. The Save Playlist dialog box opens.
- Choose a folder where you want to save your playlist.
- In the File name field, type a name for your playlist.
- In the Save as type drop down list, choose M3U Playlist or PLS Playlist. M3U is fine in most situations. If your playlist contains international (unicode) titles, then you should select M3U8 Playlist.
- Click Save to save your playlist.
To save a playlist in the Media Library
- Open the Media Library and click Playlists in the left pane.
- Click the Import button at the bottom of the right pane.
- Select one of the following three options:
- Import playlists from folder
- Import (active) current playlist
- Import playlist from file
- The imported playlists appear in the list above.
Searching Your Playlist
Searching with Jump to File:
To search a large playlist, whilst the Playlist Editor window is in focus, hit the 'J' or 'F3' key on your keyboard to open the 'Jump to File' dialog. The entire playlist will initially appear in the search results, and will be filtered-out as you type into the Search field.
Tip: By default, the search results will match any of the Artist, Title and containing Folder criteria. To fetch results for Album or any other fields from the file tags, first you will need to adjust your Advanced Title Formatting syntax for the Playlist Editor accordingly.
Note: The JTF dialog can be configured to taste via the Jump to File Options.
Queueing songs to be played next:
To queue up a song in the Playlist Editor, either highlight the playlist entries and press the 'Q' key, or hold down the Alt key and left-click your selection, or right-click one of the selected entries and click 'Enqueue selected' via the 'Jump to File' submenu.
Note: You can manage the Queue via the "Enqueue List" page in the Jump to File Options, or via the "Jump to File" dialog (see screenshot below). Click the large "Search mode" button to switch the dialog to "Manage mode".
Using 'Jump to File' to Queue Songs:

Winamp Preferences
What do you expect from a fully customizable media player? Lots of options and preferences? Yes, you are correct. We have one of the most comprehensive list of options you can play around with.
To edit the Winamp Preferences, do any of the following:
- Open the Options menu and click Preferences.
- Press the CTRL+P keys on your keyboard.
- Right-click in the Winamp main window, open the Options menu, and click Preferences.
Tip:
- For quick information about a preference, place the mouse cursor over a preference, radio box, or checkbox. A tooltip will appear explaining the preference.
To learn more about Preferences and each & every option, check our Winamp Preferences guide.
The Winamp Media Library
The Media Library
Winamp features a complete Media Library that gives you access and organization over your media content, both online and offline.
The Media Library includes the following views:
- Now Playing: Shows information or web pages related to the current track, if available...
- Bookmarks: For storing quick links to your favorite online streams.
- History: Keeps track of when and how many times any items (remote streams, local media, etc) are played through Winamp.
- Local Media: Displays files on your computer that you've added to
the Media Library. To add files to your media library, click "Add Media to
Library" via the "Library" button, then select a folder that contains the
media files you want to add.
- Audio: Displays audio files in the Media Library based on artist, album, or genre.
- Video: Displays video files in the Media Library.
- Smart Views: Create your own Smart Views with the powerful Query Editor.
- Playlists: Allows you to create and import playlists. Playlists added to the Media Library are listed underneath this option.
- Rip & Burn: Lists your CD/DVD Drives and provides the interface for ripping and burning Audio Cds.
- Portables: Lists the portable media devices connected to your computer that Winamp can manage, such as: iPod, Creative Nomad, USB Thumbdrives, PlaysForSure (P4S), Android and ActiveSync Devices, etc.
- Online Services: Lists SHOUTcast Radio and TV stations that you can search by keyword, bandwidth and genre. Also includes: 7digital mp3 store, exfm, TourTracker, AOL Radio (USA-only), Ourstage Radio, Lyrics services, and more.
- Podcast Directory: Allows you to download and subscribe to over
30,000 audio and video podcasts. To directly add podcast RSS feeds to your
subscriptions, click on the "Add" button in the Subscriptions view and input
the feed in the field box.
- Subscriptions: Allows you to manage all your subscribed and downloaded podcasts. Add and delete subscriptions, manage preferences, and download and stream podcasts from this view.
- Downloads: Displays the progress and history of media downloads from online services. This view will only be displayed when downloads are currently available to view.
- Winamp Add-Ons: A search portal for discovering new Skins and Plugins.
Adding Files to the Media Library
To add files to the Media Library
- If the Media Library isn't open, open the View menu located in the Winamp main window and click Library or by pressing ALT+L on your keyboard.
- Open the File menu in the Media Library and click Add Media to Library. The Add Media to Library window appears. (Note, also accessible by clicking the "Library" button)
- Select the folder that contains the media files you wish to add. Note: Winamp will scan the folder and all its sub folders for supported media files. You should scan a specific folder (C:\My Music) rather than your entire hard drive (i.e. C:\) to shorten the time it takes for Winamp to scan for files.
- Click OK to confirm your choice.
Tip:
- To add single files to the Library, right-click items in the Playlist Editor window, and select: Send To -> Add To Local Media.
Searching Your Media Library
To search your local media
- If the Media Library isn't yet open, open the View menu and click Library.
- Click Local Media in the left pane of the Media Library.
- In the Search field, type a search term. As you type, matching tracks are displayed.
To search SHOUTcast Radio
- If the Media Library isn't yet open, open the View menu and click Library.
- Click Online Services in the left pane of the Media Library, then click Shoutcast Radio underneath.
- In the Search field, type a search term, such as a station name, song, artist, or genre. As you type, stations that contain the search term you type are displayed.
To search SHOUTcast TV
- If the Media Library isn't yet open, open the View menu and click Library.
- Click Online Services in the left pane of the Media Library, then click Shoutcast TV underneath.
- In the Search field, type a search term, such as a station name, song, artist, or genre. As you type, stations that contain the search term you type are displayed.
Online Services
Online Services Gallery
The Online Services view lists Shoutcast Radio & TV stations, a selection of AOL & CBS Radio stations (USA-only), Winamp Charts, plus a host of various other 3rd-party services - some handpicked by us, some submitted by 3rd-party developers. To subscribe to Channels, open the Media Library and go to the Online Services root view in the tree (left pane). Note, all the Channels are free, but some are ad-sponsored.
Online Services Gallery view:
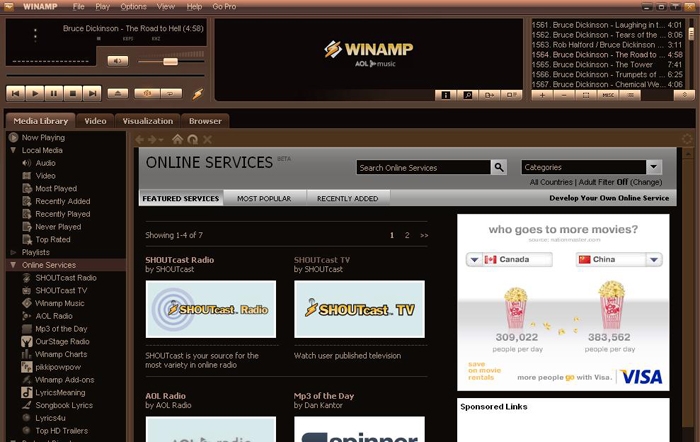
Under the Featured, Most Popular and Recently Added tabs in the right-pane, select the Services/Channels you would like to subscribe to by clicking on any listed Service and then clicking the "Add to Winamp" button. These will then appear underneath the Online Services view in the left pane of the Media Library. Select any of these to view the available content in the right pane. The example covered below is of the SHOUTcast Radio view.
You can use the Navigation Bar along the top to go Back, Forward, Home, Reload, or Stop. You can also right-click on the Navigation Bar itself to access options where you can set it to appear at the top or bottom, or also set it to auto-hide (where a mouseover will then make it auto reappear).
You can also right-click on any of your subscribed Services (listed in the tree under Online Services in the left pane) to access a menu where you can Rate, Remove, Report or Get Info about that particular service. These same menu items are also available via the Options button on the far right of each subscribed channel's Navigation Bar.
SHOUTcast Radio
Please also check out the SHOUTcast Getting Started Guide.
Online Services Security
Winamp Online Services Security
Winamp Online Services is a powerful new way for web developers to create engaging content for millions of Winamp users. However, with great power comes great responsibility. Since online services have access to more information from the Winamp client than an ordinary web page, it is very important that we provide some mechanism to provide security for the users.
There are certain activities that online services can perform that are not considered a security risk, for example, examining the current position of a song being played. However, for others a security dialog will be presented whenever a service tries to perform the action for the first time.
Winamp has reviewed certain Online Services and pre-authorized them. Pre-authorized services will not have security dialogs presented during use of that service. Here is a list of pre-authorized services:
- SHOUTcast Radio
- SHOUTcast TV
- Winamp Charts
- AOL Radio (USA-only)
- Song of the Day
- OurStage Radio
Security Dialog Prompts
Security prompts contain a description of the action being attempted, Allow and Deny buttons, and a checkbox:

Replies, either Allow or Deny, to security prompts are saved for each online service.
- Allow: Allows the online service to perform the action. It will also automatically ALLOW other related actions. The list below will identify which actions are related.
- Deny: Does NOT allow the online service to perform the action. It will also automatically DENY other related actions.
- Apply to all requests from this service: When this checkbox is selected, the choice (Allow or Deny) will be used as the response to all subsequent security prompts for this service. This is a quick way to indicate that a particular online service should be allowed or denied (depending on the button pressed) to perform all actions.
Security Prompt Messages
- This service is trying to control playback: The online service is attempting to Play, Stop, Pause, Jump to the previous track, or Jump to the next track.
- This service is trying to monitor playback events: The online
service is requesting to be notified when playback events occur. The possible
events are Play, Pause, Stop, End of File. Note these events will occur
whether initiated from scripts or from the user clicking on the buttons
themselves. Some events carry additional information:
- Play provides the filename/URL of the asset being played.
- Stop provides the current position where playback was halted. End of File indicates that the end of the asset has been reached.
- Pause provides a flag indicating whether the player was paused or unpaused.
- End of File happens at the end of an asset before the next one is played.
- This service is trying to get information about the currently playing song: The online service is requesting "Metadata" information from the current asset. "Metadata" is additional information that MAY be part of the asset, such as author or title, that is not actually part of the song itself. The existence of metadata depends on the format of the data and whether it was added when the asset was digitized.
- This service is trying to access your active playlist: The online service is trying to alter the Play Queue. It may be trying to play a single asset, add assets to the queue or clear the queue.
- This service is trying to get information about an item in your Play Queue: The service is trying to gather information about an asset within the play queue.
- This service is trying to access the playlists in your media library: The online service is trying to obtain a list of all Winamp playlists known to your Winamp client. It may also be trying to open a playlist to manipulate the assets within or it may be trying to save a modified playlist.
- This service is trying to access your bookmarks: The online service is trying to create a bookmark in your Media Library Bookmarks.
- This service is trying to subscribe you to a podcast: The online service is trying to subscribe to a podcast and add an entry in your Media Library Podcasts.
- This service is trying to provide metadata to Winamp: The online service is trying to add metadata for an asset. This might be useful if the online service can provide better metadata than comes as part of the asset itself.
- This service is trying to access information about media supported by Winamp: The service is trying to determine if the Winamp client supports a certain encoding formation, for example "mp3".
- This service is trying to access information about media on your computer: The online service is attempting to get metadata from an asset.
- This service is trying to access your playback history: The Winamp History is a collection of information about the assets you play, how many times they were played and when was the last time they were played. It is used to determine what the users favorite songs are.
- This service is trying to launch a website in the browser: The online service is trying to launch a new web site in the browser. The browser may be internal to Winamp, which means it could be an online service or it could be launched in an external browser where it does not benefit from the online services api calls.
- This service is trying to access information about Winamp: The online service is trying to gather information regarding the version of Winamp or the language pack that is being used by Winamp.
- This service is trying to access your skin settings: The online service is trying to obtain information regarding the current skin used by the Winamp client. This could be used to synchronize the colors of the service with that of the Winamp player.
Related Links:
Media Library Online Services Preferences
Devices Interface
Winamp can manage many Portable Media Players and Devices. Connect your device to the computer, go to the Devices view in the Media Library, then select your portable player in the list underneath to view all the songs currently stored on the device.
For more info, check out the Winamp
Portables guide.
Related Topics:
- Media Library Preferences: Portables
- Device Support Matrix
- How to manage your music in iPod using Winamp
- Winamp For Android
Podcast Directory
Podcast Directory lists over 30,000 free audio and video podcasts to subscribe and download. To access the directory, open the Media Library and click Podcast Directory in the left pane. Podcasts can be streamed directly from the source or downloaded for playback.
Search and Discover Podcasts Discover podcasts by using search,
browsing by category or channel and using the 'Most Popular' and 'From AOL'
tabbed listings. The podcast search box sits at the top of the directory
listing and allows you to search by podcast names and description keywords.
Category browsing lists podcast within a particular topic and Channel browsing
lists all available podcasts by a particular publisher. All directory views can
be sorted by user ratings and by alphabetical order.
Subscribing To subscribe to a podcast from the directory, click
the “Subscribe” button underneath the podcast thumbnail. To add a podcast
directly to your subscriptions using an RSS feed, click the "Add" button in the
Subscriptions view, paste in the URL and click "Add." All podcasts that you
subscribe to will now appear in the Subscriptions view.
Subscriptions View The Subscriptions view under the Podcast
Directory allows you to manage your podcast subscriptions. View podcast shows
in the left pane, podcast episodes in the right pane and podcast detailed
information in the bottom pane. Use the displayed buttons to Add, Remove,
Refresh and Edit to manage podcasts.
Preferences Podcast preferences allow you to set frequency of
automatic subscription updates, set automatic downloads of new episodes and set
the download location for podcasts. You can edit the default settings in the
Podcast Directory Preferences. To set individual podcast preferences, select
the podcast show in the Subscriptions view, and click the “Edit” button.
Adding Podcasts Podcasters who do not find their content listed in
the directory, submissions can be made through Winamp.
Podcast Directory - Manual Subscriptions

To manually subscribe to a podcast from an external website, copy the URL
of the RSS Feed supplied by the website, click the 'Add' button under the
Channels pane, and paste in the URL. Note, that you can also manually subscribe
to feeds via the "Add Feed" field in the Podcasts Directory root view.
Podcast Directory - Downloads

You can manage your downloaded podcasts via the Downloads view. Use the
buttons or right-click menu to Play, Enqueue, Remove or Delete selected items.
Note that the Delete action will physically delete the saved podcast file from
your hard drive (whereas the Remove action will just remove it from the
Downloads list).
Note: We recommend that you go to the Podcast Directory Settings first, where you can set your personal choice of folder for storing downloaded podcasts, or where you can change the default frequency for automatic Subscription Updates, if required.
Playlist Generator
To use the Winamp Playlist Generator feature
- Right-click items in the Local Media section of the Media Library or in the Playlist Editor window and select "Play tracks similar to...". On first use, the Playlist Generator dialog will appear and prompt you to Scan your Media Library.
- Alternatively, go to the Winamp Preferences (Ctrl + P) and navigate to: Plug-ins --> Media Library. Double click Nullsoft Playlist Generator (or highlight it and click the 'Configure' button).
- In the Winamp Playlist Generator configuration dialog, click the Scan button. The Playlist Generator will now proceed to scan all the Local Media audio files in your Media Library. Note: the Scan may take a little while. The more files in your library, the longer the complete scan will take. You can close the Configuration dialog if you wish, by clicking the OK button, and the scan will still continue in the background.
- Once the Scan is complete, you are now ready to use this feature. You can now right-click any local music files listed in your Playlist or Media Library and select: Play tracks similar to (title).
- The Playlist Generator will then add between 10 to 200 (depending on what figure you select in the configuration) acoustically similar tracks to your playlist, starting with the selected file, and will begin playing them.
- Note: This feature obeys the "Double click or Enter in Library = Plays or Enqueues selected items" setting in: Prefs --> Media Library -> Library Options
Music recognition technology and related data are provided by Gracenote. Gracenote is the industry standard in music recognition technology and related content delivery. For more information visit www.gracenote.com.
CD and music-related data from Gracenote, Inc., copyright © 2007 Gracenote. Gracenote Software, copyright © 2007 Gracenote. This product and service may practice one or more of the following U.S. Patents: #5,987,525; #6,061,680; #6,154,773, #6,161,132, #6,230,192, #6,230,207, #6,240,459, #6,330,593, and other patents issued or pending. Some services supplied under license from Open Globe, Inc. for U.S. Patent: #6,304,523.
Gracenote and CDDB are registered trademarks of Gracenote. The Gracenote logo and logotype and the "Powered by Gracenote" logo are trademarks of Gracenote.
For more information on using the Gracenote Service, visit: www.gracenote.com/corporate
Ripping and Burning with Winamp
Ripping CD Tracks to Your PC
Want to have your CDs available on your computer? Winamp lets you rip (transfer and compress digitally) your CDs to your computer hard drive. This means you can listen to them without having to pop in the CD. It also means you can create your own playlists using individual tracks from different albums.
Note: Before ripping tracks to your computer, you should first
configure the CD ripping settings. For more information, see Media Library Preferences: CD Ripping.
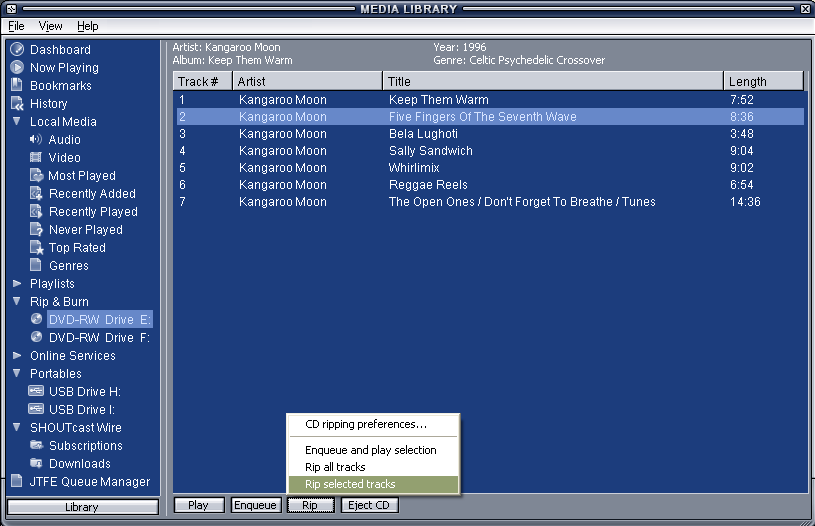
To rip CD tracks to your computer hard drive
Insert a CD that has tracks you want to transfer to your computer hard drive. Open the View menu in the Winamp main window and click Media Library.
- On the left side of the Media Library, click on your CD drive within the
Rip & Burn list.
- You may have to double-click Rip & Burn to see your list of CD/DVD drives.
- If you don't see the Rip & Burn node, then go to: Winamp -> Preferences (Ctrl+P) -> Media Library -> Tree Options tab and checkmark "Group CD Drives under the 'Rip & Burn' parent". A numbered list of tracks appear in the track list on the right.
- CDDB will automatically fill in the Titles, but if you wish to manually edit any of the CD Information first, right-click anywhere in the window, and select Edit CD Info.
- If you want to rip some of the tracks on your CD, select the tracks you want to rip in the track list. You can keep Ctrl pressed down to select more than one track.
- Open the Rip menu and click one of the following:
- Rip selected tracks: Click this to rip the tracks currently selected in the track list.
- Rip all tracks: Click this to rip all of the tracks on your CD, regardless of the currently selected tracks.
- The status window appears to show you track ripping progress and speed.
- When done, the ripped tracks will be available in your Local Media views (Audio, Recently Added, etc) and will be physically located within the folder you specified in the Media Library: CD Ripping Preferences.
For further in-depth information, a full comprehensive CD Ripping Tutorial by Gaekwad2 can be found
in the Winamp Forums.
Related links:
Burning Tracks to CDs
Winamp makes the joy of burning (creating) your own music CDs even easier with built-in CD burning. Add individual tracks, a folder, or just burn the playlist you're listening to right now.
To burn tracks to an Audio CD
- Insert a blank CD-R or CD-RW into your computer's CD Recorder.
- Open the View menu in the Winamp main window and select Library (or press ALT+L) to launch the Media Library.
- On the left pane of the Media Library, select your CD recorder within the
Rip & Burn list. CD/DVD-RW Drives will be identified as: CD
Recorder <Drive Letter> e.g. CD Recorder (E:)
- Note: You may have to double-click Rip & Burn to see your list of CD/DVD-RW drives. If you don't see the Rip & Burn node, then go to: Winamp -> Preferences (Ctrl+P) -> Media Library -> Tree Options tab and checkmark "Group CD Drives under the 'Rip & Burn' parent"
- You can queue tracks to burn in the following ways:
- Add menu in Burn view: Open the Add menu and click one of
the following:
- Files: Click this to add one or more files. You can keep CTRL pressed down to select more than one file.
- Folder: Click this to add all the files in a folder.
- Current Playlist: Click this to add the tracks in your current playlist.
- Note: As you add tracks to burn, the used and available time is displayed above the list. Make sure you do not exceed your blank disc's capacity.
- Drag and Drop
- Select a file or group of files (press CTRL or Shift to select individual or group of files when clicking on desired items) from the Local Media views
- While pressing the left mouse button, drag and drop the selected files onto your CD recorder device
- Note: You can also add files by right-clicking Local Media or Playlist entries, and using the Send To submenu (eg. Send To > CD Burner on X:)
- Burning Playlists
- Using the Playlist view of the Media Library, create a new playlist or import an existing playlist.
- Switch to that playlist by clicking it in the left pane of the Media Library.
- Click the Manage Playlists button located within the Playlist view, and select: Send playlist to > CD Burner.
- Note: This action will queue all the playlist items into the CD
Recorder view. This method is not recommended for using with large
playlists where the total time would greatly exceed the burn
limit!
- Add menu in Burn view: Open the Add menu and click one of
the following:
Switch to the CD Recorder view to burn the CD.
- You can rearrange the Track Order by dragging selected items up and down the list, or by right-clicking and selecting 'Move selected items up/down'. Similarly, You can remove undesired tracks from the Burn List by using the Del key, or by right-clicking and selecting 'Remove selected items'.
- Click Burn when you are done adding tracks to the list. The final dialog box for burning appears.
- Choose from the following options:
- Burn speed: Use the drop-down list to select the speed at which you want to burn your tracks. If you have Winamp Pro, you can select the maximum speed that your CD recorder allows.
- Enable burn-proof mode: Select this to help ensure that CD burning doesn't fail.
- Test mode: Select this to do a test burn that doesn't actually affect the CD.
- Click Burn to start burning your tracks to CD.
Related links:
Winamp for Android
Please visit the Winamp For Android
Help section.
Winamp for Mac Sync Beta
Please visit the Winamp
For Mac Help section.
Trouble Shooting
Known Issues
Tip: For more technical support information, visit the Winamp Forums.
These are some of the known issues for Winamp:
- If The CD ejects without writing audio files, close and reopen Winamp. If this does not solve the issue, reboot the computer or try reinstalling Winamp. This issue may affect users with the PHILLIPS CDD4801 CD-R/RW burner.
- Static/whitenoise when pausing & resuming playback? Go to: Winamp > Prefs > Plugins > Output > DirectSound > Configure, and checkmark "Old style fade on pause" under the "Fading" tab. This issue may affect users with Soundmax onboard sound chips.
- The fullscreen video OSD in Winamp 5.57 (or above) is never displayed? The fullscreen OSD requires DirectX 9 to be present, plus d3dx9_24.dll (Win2k/XP) or d3dx9_32.dll (Win7) or higher. The Winamp installer should have already detected your DirectX version and, if required, either upgraded it or installed any missing files. If for some reason the DX9 upgrade failed, then you can download it manually from here. We have also identified an issue where the OSD does not display on PCs using the Intel(R) 82945G Express Chipset with Intel drivers version 6.13. Upgrading the drivers to 6.14 (or newer) solves the problem.
- Need to contact Winamp Pro support? Refer to the Forum FAQ to contact Tech Support or use DigitalRiver Customer Care.
A full comprehensive list of minor Common Issues can be found in the Winamp Forums.
Winamp Toolbar
System Requirements
- Internet Explorer or Firefox
- Windows XP/Vista/7/8
- Works best with Winamp 5.6 & above